Showing posts with label Simple Android App. Show all posts

Saturday, 18 October 2014

Capturing image in Android

Hi friends let us learn how to create a camera based application in android.

Basics for capturing a image using existing camera in our mobile

You will use MediaStore.ACTION_IMAGE_CAPTURE to launch an existing camera application installed on your phone. Its syntax is given below
Intent intent = new Intent(android.provider.MediaStore.ACTION_IMAGE_CAPTURE);
Apart from the above , there are other availaible Intents provided by MediaStore. They are listed as follows
Sr.NoIntent type and description
1ACTION_IMAGE_CAPTURE_SECURE
It returns the image captured from the camera , when the device is secured
2ACTION_VIDEO_CAPTURE
It calls the existing video application in android to capture video
3EXTRA_SCREEN_ORIENTATION
It is used to set the orientation of the screen to vertical or landscape
4EXTRA_FULL_SCREEN
It is used to control the user interface of the ViewImage
5INTENT_ACTION_VIDEO_CAMERA
This intent is used to launch the camea in the video mode
6EXTRA_SIZE_LIMIT
It is used to specify the size limit of video or image capture size
Now you will use the function startActivityForResult to launch this activity and wait for its result. Its syntax is given below
startActivityForResult(intent,0)
This method has been defined in the activity class. We are calling it from main activity. There are methods defined in the activity class that does the same job , but used when you are not calling from the activity but from somewhere else. They are listed below

Sr.NoActivity function description
1startActivityForResultIntentintent,intrequestCode,Bundleoptions
It starts an activity , but can take extra bundle of options with it
2startActivityFromChildActivitychild,Intentintent,intrequestCode
It launch the activity when your activity is child of any other activity
3startActivityFromChildActivitychild,Intentintent,intrequestCode,Bundleoptions
It work same as above , but it can take extra values in the shape of bundle with it
4startActivityFromFragmentFragmentfragment,Intentintent,intrequestCode
It launches activity from the fragment you are currently inside
5startActivityFromFragmentFragmentfragment,Intentintent,intrequestCode,Bundleoptions
It not only launches the activity from the fragment , but can take extra values with it
No matter which function you used to launch the activity , they all return the result. The result can be obtained by overriding the function onActivityResult.

Example

Here is an example that shows how to launch the exisitng camera application to capture an image and display the result in the form of bitmap
To experiment with this example , you need to run this on an actual device on which camera is supported.
StepsDescription
1You will use Eclipse IDE to create an Android application and name it as Camera under a package com.example.camera. While creating this project, make sure you Target SDK and Compile With at the latest version of Android SDK to use higher levels of APIs.
2Modify src/MainActivity.java file to add intent code to launch the activity and result method to recieve the output.
3Modify layout XML file res/layout/activity_main.xml add any GUI component if required. Here we add only imageView and a textView.
4Modify res/values/strings.xml to define required constant values
5Run the application and choose a running android device and install the application on it and verify the results.
Following is the content of the modified main activity file src/com.example.camera/MainActivity.java.
package com.example.camera;


import android.os.Bundle;
import android.app.Activity;
import android.content.Intent;
import android.graphics.Bitmap;
import android.view.Menu;
import android.view.View;
import android.view.View.OnClickListener;
import android.widget.ImageView;

public class MainActivity extends Activity {

ImageView imgFavorite;

   @Override
   protected void onCreate(Bundle savedInstanceState) {
      super.onCreate(savedInstanceState);
      setContentView(R.layout.activity_main);
      imgFavorite = (ImageView)findViewById(R.id.imageView1);
      imgFavorite.setOnClickListener(new OnClickListener() {
         @Override
         public void onClick(View v) {
            open();
         }
      });
   }
   public void open(){
      Intent intent = new Intent(android.provider.MediaStore.ACTION_IMAGE_CAPTURE);
      startActivityForResult(intent, 0);
   }

   @Override
   protected void onActivityResult(int requestCode, int resultCode, Intent data) {
      // TODO Auto-generated method stub
      super.onActivityResult(requestCode, resultCode, data);
      Bitmap bp = (Bitmap) data.getExtras().get("data");
      imgFavorite.setImageBitmap(bp);
   }
   @Override
   public boolean onCreateOptionsMenu(Menu menu) {
      // Inflate the menu; this adds items to the action bar if it is present.
      getMenuInflater().inflate(R.menu.main, menu);
      return true;
   }
}
Following will be the content of res/layout/activity_main.xml file:

<RelativeLayout xmlns:android="http://schemas.android.com/apk/res/android"
   xmlns:tools="http://schemas.android.com/tools"
   android:layout_width="match_parent"
   android:layout_height="match_parent"
   android:paddingBottom="@dimen/activity_vertical_margin"
   android:paddingLeft="@dimen/activity_horizontal_margin"
   android:paddingRight="@dimen/activity_horizontal_margin"
   android:paddingTop="@dimen/activity_vertical_margin"
   tools:context=".MainActivity"> 

   <ImageView
   android:id="@+id/imageView1"
   android:layout_width="match_parent"
   android:layout_height="match_parent"
   android:layout_marginLeft="34dp"
   android:layout_marginTop="36dp"
   android:contentDescription="@string/hello_world"
   android:src="@drawable/ic_launcher" />

   <TextView
   android:id="@+id/textView1"
   android:layout_width="wrap_content"
   android:layout_height="wrap_content"
   android:layout_alignParentTop="true"
   android:layout_alignRight="@+id/imageView1"
   android:text="@string/tap"
   android:textAppearance="?android:attr/textAppearanceLarge" />

</RelativeLayout>
Following will be the content of res/values/strings.xml to define one new constants
<?xml version="1.0" encoding="utf-8"?>
<resources>
   <string name="app_name">Camera</string>
   <string name="action_settings">Settings</string>
   <string name="hello_world">Hello world!</string>
   <string name="tap">Tap the image to open the camera!!</string>
</resources>
Following is the default content of AndroidManifest.xml:
<?xml version="1.0" encoding="utf-8"?>
<manifest xmlns:android="http://schemas.android.com/apk/res/android"
   package="com.example.camera"
   android:versionCode="1"
   android:versionName="1.0" >

   <uses-sdk
      android:minSdkVersion="8"
      android:targetSdkVersion="17" />

   <application
      android:allowBackup="true"
      android:icon="@drawable/ic_launcher"
      android:label="@string/app_name"
      android:theme="@style/AppTheme" >
         <activity
            android:name="com.example.camera.MainActivity"
            android:label="@string/app_name" >
            <intent-filter>
               <action android:name="android.intent.action.MAIN" />

               <category android:name="android.intent.category.LAUNCHER" />
            </intent-filter>
        </activity>
   </application>

</manifest>
Let's try to run your Camera application. I assume you have connected your actual Android Mobile device with your computer. To run the app from Eclipse, open one of your project's activity files and click Run Eclipse Run Icon icon from the toolbar.

Saturday, 3 May 2014

Android - A Wizard of Mobile OS

What is Android  ?

Operating Systems have developed a lot in last 15 years. Starting from black and white phones to recent smart phones or mini computers, mobile OS has come far away. Especially for smart phones, Mobile OS has greatly evolved from Palm OS in 1996 to Windows pocket PC in 2000 then to Blackberry OS and Android. One of the most widely used mobile OS these days is ANDROID. Android is a software bunch comprising not only operating system but also middle ware and key applications.

Versions
 Why Many Versions ?


  • To eradicate bugs
  • To make improvements.
    Eg. Android Beam
     
Development Kit
To develop apps for Android devices, you use a set of tools that are included in the Android SDK. Once you've downloaded and installed the SDK, you can access these tools right from your Eclipse IDE, through the ADT plugin, or from the command line. Developing with Eclipse is the preferred method because it can directly invoke the tools that you need while developing applications.
However, you may choose to develop with another IDE or a simple text editor and invoke the tools on the command line or with scripts. This is a less streamlined way to develop because you will sometimes have to call command line tools manually, but you will have access to the same number of features that you would have in Eclipse.

How to Download SDK bundle ?

Step 1 : Go to Android Developers official Website

Step 2: Click the button download the SDK bundle for windows, after agreeing the terms and conditions choose the bit order for your computer as 32 or 64 bit

Step 3:  Unbundle the downloaded SDK and create your first Application.


You may also download the SDK from here,

For 32 bit,
http://dl.google.com/android/adt/22.6.2/adt-bundle-windows-x86-20140321.zip
For 64 bit,
dl.google.com/android/adt/22.6.2/adt-bundle-windows-x86_64-20140321.zip

All the Very best Guys, Best of Luck for your Success.

Tuesday, 29 April 2014

Simple App with Basic features


Simple App with Basic features


basic app, addition, android addition, Simple Android App, Simple App, Learn Android, Application, App, Android Basic App, Android basic, Android App, Android, TextView, EditText, Button, Layout, HorizontalLayout, TextView Example, EditText Example, LayoutExample, Button Example, HorizontalLayout Example, LinearLayout, LinearLayout Horizontal, LinearLayout Horizontal example, Addition Example, Android Addition

Hi friends in this post we are going to learn about how to create a App which get two values from the user and perform the arithmetic operations according to user specified, ie. Simple calculator.
Basic UI features required for this App is,
·         2 EditText ->To get Input.
·         4 Button -> Arithmetic operations denoting Add, Sub, Mul, Div.
·         1 TextView -> Display Output.

  1. Create a New App similarly done in previous post, and Design the UI based on above features.
  2. First insert two EditText to get  numbers from the user by drag and drop from the palette Text Fields column. Since we are going to perform arithmetic operations choose the EditText whose Input type as Number (Recommended). You may also able to select it in the properties column of the EditText, which will appear on right side of our SDK.
basic app, addition, android addition, Simple Android App, Simple App, Learn Android, Application, App, Android Basic App, Android basic, Android App, Android, TextView, EditText, Button, Layout, HorizontalLayout, TextView Example, EditText Example, LayoutExample, Button Example, HorizontalLayout Example, LinearLayout Horizontal example, Addition Example, Android Addition

             3.   Insert four buttons (Add, Sub, Mul, Div) similarly in the Layout, it should be functioned as by pressing each button you may get corresponding result of the operation. We will set the buttons easily in order by changing the layout to linear layout (Horizontal) it will provide us great flexibility to set the buttons in a single horizontal row which looks better.

  • ·         Drag and Drop four buttons to the layout from palette Form Widgets
basic app, addition, android addition, Simple Android App, Simple App, Learn Android, Application, Android App, Android, TextView, EditText, Button, Layout, HorizontalLayout, TextView Example, EditText Example, LayoutExample, Button Example, HorizontalLayout Example, LinearLayout, LinearLayout Horizontal, LinearLayout Horizontal example, Addition Example, Android Addition
  •       Change the Layout to Linear layout (Horizontal) for particular buttons by dragging Linear    Layout(Horizontal) from palette
basic app, addition, android addition, Simple Android App, Simple App, Learn Android, Application, App, Android Basic App, Android basic, Android App, Android, TextView, EditText, Button, Layout, HorizontalLayout, TextView Example, EditText Example, LayoutExample, Button Example, HorizontalLayout Example, LinearLayout, LinearLayout Horizontal, LinearLayout Horizontal example, Addition Example, Android Addition

  • Now you can able to set 4 buttons horizontally one another inside the Linear Layout (Horizontal) .
basic app, addition, android addition, Simple Android App, Simple App, Learn Android, Application, App, Android Basic App, Android basic, Android App, Android, TextView, EditText, Button, Layout, HorizontalLayout, TextView Example, EditText Example, LayoutExample, Button Example, HorizontalLayout Example, LinearLayout, LinearLayout Horizontal, LinearLayout Horizontal example, Addition Example, Android Addition

Thus the design part get over and show your own logic in the coding and finish your second app with some basic features.

Wednesday, 23 April 2014

To create a First Android App


To create a First Android App
Android,Tikshniyas,SimpleApp,Basic features,Ecllipse


Step 1: Open Eclipse Application in your Android SDK bundle

Android,Tikshniyas,SimpleApp,Basic features,Ecllipse
Step 2: Select a workspace where ADT stores your projects
Android,Tikshniyas,SimpleApp,Basic features,Ecllipse

Step 3: Choose New ----> Android Application project

Android,Tikshniyas,SimpleApp,Basic features,Ecllipse
Step 4:  A popup window creates, in which you describe your Application name, Project Name, Package Name(You can specify any common name for your App collection), and other details etc and press next.
Android,Tikshniyas,SimpleApp,Basic features,Ecllipse

Step 5: Configure your project similarly and press next.
Android,Tikshniyas,SimpleApp,Basic features,Ecllipse


Step 6: Configure your launcher icon which you can also able to change later. You can set your custom image by choosing a image by browsing
Android,Tikshniyas,SimpleApp,Basic features,Ecllipse

Step 7: select the mode of Activity for your App

Android,Tikshniyas,SimpleApp,Basic features,Ecllipse
Step 8: Set your Activity name and choose your Navigation type
Android,Tikshniyas,SimpleApp,Basic features,Ecllipse

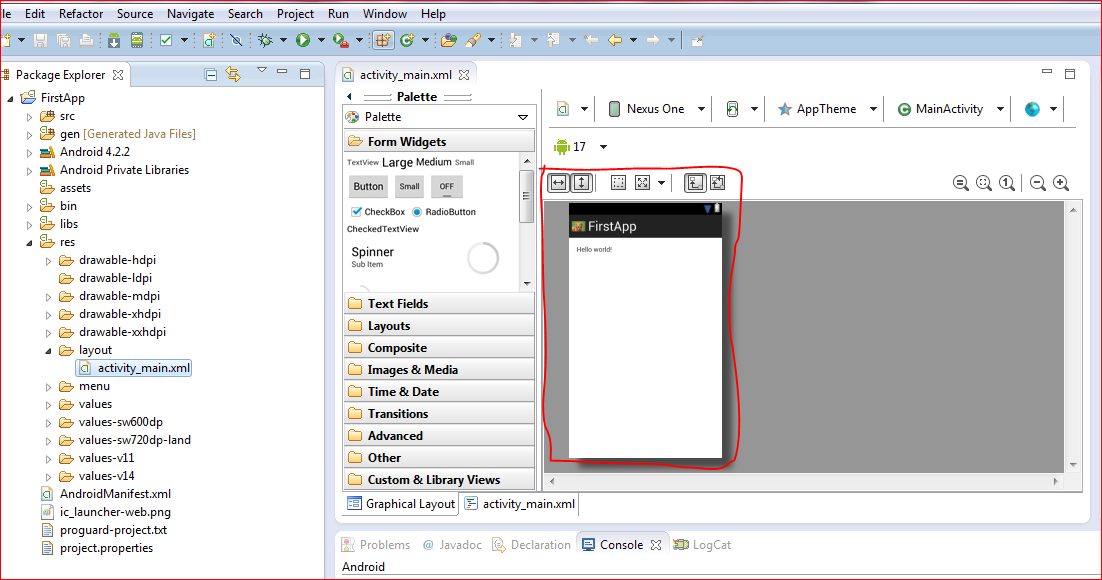
Step 9: This is the how the Application looks. The red color marked region is where you need to design

Step 10: Below Marked region is the Tool palette which consist of tools which you need to drag and drop in your design region
Android,Tikshniyas,SimpleApp,Basic features,Ecllipse

Step 11: Run the emulator which acts as a virtual device for android
Android,Tikshniyas,SimpleApp,Basic features,Ecllipse

Step 12: In case of any advanced program you may include your coding here

Android,Tikshniyas,SimpleApp,Basic features,Ecllipse
Step 13: Finally the output of this first simple hello world is displayed in emulator as,

Android,Tikshniyas,SimpleApp,Basic features,Ecllipse